Showing posts with label big dreams embroidery. Show all posts

Snow Globe Banner and how to add the "flitter".

When stitching the Snow Globe Banner ITH Project, you have the option of adding a clear vinyl layer before the final Satin Stitch edge finish and the option of inserting "flitter" inside the layer before the eyelets are stitched.

Snow Globe Banner ITH Project by Big Dreams Embroidery
Neither the clear vinyl nor the "flitter" are necessary but depending on the look you want, the additional steps can make your banner pieces look very elegant.

The easy to follow step by step instructions included with the files fully explain how the design comes together and this pictorial is to help clarify the steps for preparing the vinyl for adding the "flitter". 

If you are NOT adding "flitter", simply ignore the step for stitching the guideline and treat the vinyl like a piece of fabric as there is no need to use the guideline.

As you can see in the below image, there is a red circle which has been stitched onto the fabric.  This step Color 6 is the guideline (or template) for lining up the insertion hole (in the piece of clear vinyl).  The circle is exactly where the eyelet will be stitched in the last step and serves as a positioning aid. 

The red circle is the guideline for lining up the clear vinyl.
After applying the backing fabric, Color 7 asks you to cut a piece of the vinyl slightly larger than the globe (or dome) and place the vinyl onto the hoop directly on top of the globe and mark the position of the guideline hole (previously stitched in Color 6). 

Remove the piece of vinyl and then use a hole punch (or sharp pointed pair of scissors) to cut a hole where you made the mark.  The hole should be no bigger than the guideline hole -  ¼” diameter.
Use a hole punch or scissors to cut a hole in the vinyl.
Before Color 8, position the clear piece of vinyl with the hole directly over the guideline on the fabric (the red circle stitched previously).
Line up the hole in the vinyl with the guideline on the fabric.
Color 8 is the vinyl tackdown stitch for the globe.

Remove the hoop from your embroidery machine but DO NOT unhoop the project. Trim around the vinyl being careful not to pull it away from the stitches.

Take a tiny funnel (or create an open-ended cone made out of paper and tape). 
To insert the funnel tip into the hole, gently prize the vinyl forward.  Use the point of your scissors to pull the opening forward as I did in the picture below. 
Prize the hole in the vinyl forward to insert the funnel tip.
Fill with “flitter” to the desired level.  For best results, don't go above the lowest level of the snow area as you still want to see the satin stitching.
Shake the “flitter” down to the snow area before inserting the hoop back into your machine.

Color 11 is the stitching of the eyelets. As the eyelets are being stitched the "flitter" will want to jump around inside of the clear vinyl.  To stop this from occurring, gently place your finger flat across the snow globe to keep the “flitter” from moving towards the needle.

Finish your banner as per the remaining instructions and don't forget to show us your completed Snow Globe Banner on Facebook or Instagram using #BigDreamsEmbroidery.

Happy embroidering!


South Carolina Range Machine Embroidery Design Applique Patterns


Show your love for South Carolina with this fun applique design range!

2 variations - South Carolina with Heart and a plain South Carolina.

These designs feature a gorgeous contrast stitch of Triple-Bean against the Satin Stitch edge which gives your sew-out a quality look. You can use the same thread color if you don't need a contrast or this step can be omitted entirely. These choices give you even more freedom to personalize your South Carolina Range appliques.

4 sizes - 3", 4", 5" and 6"

Exact sizes:
4x4 hoop - 3" x 2.37" and 3.32" x 3.1"
5x7 hoop - 5" x 3.94"
6x10 hoop - 6" x 4.74"

WHAT YOU RECEIVE:
- SOUTH CAROLINA Range in the format of your choice.
- Easy to follow Step-by-Step instructions - Simply cut as you sew!


You can find this applique range at my website: http://www.bigdreamsembroidery.com/south-carolina-range

Happy embroidering!


Bowling Pin and Bowling Ball Set Machine Embroidery Design Applique Patterns


This appliqué range is a delight to sew out.  All designs include my signature stitch of Triple Bean inside the Satin stitch edge which brings a look of luxury to your sew out.

3 designs in 5 sizes:
- Bowling Pin and Bowling Ball
- Bowling Pin
- Bowling Ball

Sizes: Bowling ball on its own is 2", 3", 4", 5" and 6". All other designs are 3", 4", 5", 6" and 7".

Exact sizes:
Bowling Pin and Bowling Ball
4x4 hoop - 3" x 2.15" and 3.93" x 2.8"
5x7 hoop - 5" x 3.56", 6" x 4.26" and 7" x 4.96"


Bowling Pin
4x4 hoop - 3" x 1.23" and 3.93" x 1.58"
5x7 hoop - 5" x 1.98", 6" x 2.37" and 7" x 2.75"

Bowling Ball
4x4 hoop - 2" x 2", 3" x 3" and 3.93" x 3.93"
5x7 hoop - 5" x 5"
6x10 hoop - 6" x 6"

WHAT YOU RECEIVE:
- BOWLING PIN AND BOWLING BALL SET in the file format of your choice.
- Easy to follow Step-by-Step instructions – Simply cut as you sew!

You can find this applique design set at my website...

Happy embroidering!

Seahorse Machine Embroidery Design Applique Pattern

Who doesn't love seeing a seahorse!

This design features a gorgeous stitch of Triple-Bean inside the Satin Stitch edge to give your stitch-out a quality look.

4 Sizes - 4", 5", 6" and 7"
PICTURED is the 4" size

Exact sizes:
4x4 hoop - 3.93” x 1.98”
5x7 hoop - 5” x 2.5", 6" x 2.98" and 7" x 3.46"

WHAT YOU RECEIVE:
- SEAHORSE Applique in the file format of your choice.
- Easy to follow Step-by-Step instructions - Simply cut as you sew!

You can find this design at my website...

Red Wagon Machine Embroidery Design Applique Pattern


This applique design is a delight to sew out and features a gorgeous inner stitch of Triple-Bean against the Satin Stitch edge to bring an added look of luxury to your stitch out.

4 sizes - 4", 5", 6" and 7"
PICTURED is the 5" sew-out.

Exact sizes:
4x4 hoop - 3.93" x 2.39"
5x7 hoop - 5" x 3.05", 6" x 3.67" and 7" x 4.28"

WHAT YOU RECEIVE:
- RED WAGON in the format of your choice.
- Easy to follow step-by-step instructions – simply cut as you sew!


You can find this applique design at my website...

Cowboy Boot Machine Embroidery Design Applique Pattern


This Cowboy Boot applique design is a delight to sew out and features a gorgeous inner stitch of Triple-Bean against the Satin Stitch edge to bring an added look of luxury to your stitch out.

4 sizes - 3", 4", 5" and 6"
PICTURED is the 5" sew-out.

Exact sizes:
4x4 hoop - 3" x 2.49" and 3.93" x 3.25"
5x7 hoop - 5" x 4.12" and 6" x 4.94"

WHAT YOU RECEIVE:
- COWBOY BOOT in the format of your choice.
- Easy to follow step-by-step instructions – simply cut as you sew!

You can find this design at my website...

Happy embroidering!

GUMBALL MACHINE Machine Embroidery Design Applique Pattern


 Fun for boys and girls alike, this super "sweet" applique design features a gorgeous stitch of Triple-Bean inside the Satin Stitch edge which gives your applique a quality look.

Personalize your gumball machine applique by omitting the fill-stitch gumballs if you wish and add a letter to the globe or you can sew on some buttons for a fun 3D effect.

6 sizes - 4", 5", 6", 7", 8" and 9"

Exact sizes:
4x4 hoop - 3.93" x 2"
5x7 hoop - 5" x 2.53", 6" x 3.02" and 7" x 3.51
6x10 hoop - 8" x 4" and 9" x 4.49"

WHAT YOU RECEIVE:
- GUMBALL MACHINE in the file format of your choice.
- Easy to follow Step-by-Step instructions - Simply cut as you sew!


You can find this applique design on my website...

Happy embroidering!

Eiffel Tower Machine Embroidery Applique Design

Show your love for Paris with this tres chic applique design of its famous landmark!

This design features a gorgeous inner contrast stitch of Triple-Bean against the Satin Stitch edge to bring an added look of elegance to your stitch out.

7 sizes - 4", 5", 6", 7", 8", 9" and 10"
Pictured is the 4" stitch out.

Exact sizes: 
4x4 hoop - 3.91" x 2.26"
5x7 hoop - 5" x 2.81", 6" x 3.33" and 7" x 3.86"
6x10 hoop - 8" x 4.37", 9" x 4.89" and 10" x 5.42"

WHAT YOU RECEIVE: 
- EIFFEL TOWER in the format of your choice.
- Easy to follow Step-by-Step instructions - Simply cut as you sew!

You can find this design at my website... www.bigdreamsembroidery.com/eiffel-tower

Happy embroidering!


Let's go shopping!

I'm so excited to announce that my website is officially live!  Even better for you, my website offers you INSTANT DOWNLOAD. 

If receiving your machine embroidery designs ASAP is important to you, then you will love that I can now offer this time-saving feature!

Come and have a look!...  http://www.bigdreamsembroidery.com/


My Etsy shop will continue to sell my designs however you need to remember that Etsy doesn't support instant download, so therefore any designs purchased from there will be delivered to you via email attachment.  ...which is me sending you an email as soon as I can (within 12 hours of receiving your order).

Happy embroidering!


Love Heart Banner ITH Project perfect for your Valentine!

This sweet banner is perfect for Valentine's Day as well as weddings, birthdays, celebrations...or a fun way to coordinate and dress up a babies room. Add letters and numbers from your embroidery machine or your personal files to personalize!

This is a quick and easy two-sided banner all done in the hoop with easy to follow step-by-step instructions to guide you. You are hooping stabilizer only, appliqueing your fabric and font/designs over the top, applying backing fabric behind your hoop, finishing the edges and ribbon holes and cutting away the stabilizer. This banner pieces slide onto ribbon 5/8" wide.

The step with the decorative Candlewick Stitches can be omitted if you wish.

3 Sizes - 4", 5" and 6"
PICTURED is 4" size.

Exact sizes:4x4 hoop - 3.92" x 3.92"
5x7 hoop - 5" x 5"
6x10 hoop - 6" x 6"

WHAT YOU RECEIVE...- LOVE HEART BANNER ITH in the format of your choice.
- Easy to follow Step-by-Step instructions – simply cut as you sew!
- Easy to follow Assembly instructions!

You can find more banner projects here... http://www.bigdreamsembroidery.com/category/catalog/hoop-projects/banners 

Happy embroidering!
 

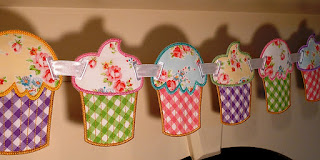
Cupcake Banner In The Hoop Banner Machine Embroidery Design Applique Patterns


This is definitely "tea party chic"! This in-the-hoop project is a fast and cute way to decorate your home for all kinds of parties. You can add letters or designs from your embroidery machine to personalize if desired!

This is a quick and easy two-sided banner all done in the hoop with step-by-step instructions to guide you. You are hooping stabilizer only, appliqueing your fabric and font (if desired) over the top, applying backing fabric behind your hoop, finishing the edges and ribbon holes and trimming away the stabilizer. This banner pieces slide onto ribbon 5/8" wide.

You receive TWO VARIATIONS in 5 sizes each - A cupcake with dripping frosting and a cupcake with a frosting peak. Mix them up together, incorporate different sizes or repeat just one - so many choices with this fun set.

5 Sizes - 4", 5", 6", 7" and 8"
PICTURED in the ginghams/shabby rose prints are the 5" banner pieces.

Exact sizes:
4x4 hoop - 3.92" x 2.88"
5x7 hoop - 5" x 3.66", 6" x 4.39 and 7" x 5.11"
6x10 hoop - 8" x 5.83"

WHAT YOU RECEIVE...
-
CUPCAKE BANNER ITH Project (2 variations) in the format of your choice.
- Easy to follow Step-by-Step instructions – simply cut as you sew!
- Easy to follow Assembly instructions!

You can find this banner at my website...
www.bigdreamsembroidery.com/cupcake-banner-ith-project 

To view more of my In-The-Hoop Banners, click here...

Happy embroidering!

Perfectly Round Banner In-The-Hoop Project Machine Embroidery Designs Applique Patterns

This sweet banner is perfect for birthdays...celebrations...or a fun way to coordinate and dress up a child's room. Add letters and numbers from your embroidery machine to personalize!

This is a quick and easy two-sided banner all done in the hoop with easy to follow step-by-step instructions to guide you. You are hooping stabilizer only, appliqueing your fabric and font/designs over the top, applying backing fabric behind your hoop, finishing the edges and ribbon holes and cutting away the stabilizer. This banner pieces slide onto ribbon 5/8" wide.

Please be forewarned that there are jump stitches for the circle of decorative stitches. The circle of decorative stitches can be omitted if you wish.

3 Sizes - 4", 5" and 6"
PICTURED is 4" size. NB The font is not included.

Exact sizes:
4x4 hoop - 3.92" x 3.92"
5x7 hoop - 5" x 5"
6x10 hoop - 6" x 6"

WHAT YOU RECEIVE...
- PERFECTLY ROUND BANNER ITH in the format of your choice.
- Easy to follow Step-by-Step instructions – simply cut as you sew!
- Easy to follow Assembly instructions!

PLEASE NOTE: This banner does not come with any lettering as photographed. To personalize, add letters from your embroidery machine or your own files. The font used in the banner photographed is available for sale in my shop. It is Olivia Font
http://www.etsy.com/listing/64969080/olivia-font-elegant-machine-embroidery

You can find more banners here...
http://www.etsy.com/shop/BigDreamsEmbroidery?section_id=7404677

Happy embroidering!

Turkey Banner In The Hoop Banner Machine Embroidery Design Applique Pattern

 A fun decoration you can make for Thanksgiving!  You can also add letters from your embroidery machine to personalize! The ribbon "legs" are an optional step.

This is a quick and easy two-sided banner all done in the hoop with step-by-step instructions to guide you. You are hooping stabilizer only, appliquéing your fabric, adding ribbon "legs" and font/designs over the top if you wish, applying backing fabric behind your hoop, finishing the edges and ribbon holes and cutting away the stabilizer. This banner blank slides onto ribbon 5/8" wide.

3 Sizes - 4", 5" and 6"
PICTURED is the 5x7 hoop size - 5" x 5".

Exact sizes:
4x4 hoop - 3.93" x 3.93"
5x7 hoop - 5" x 5"
6x10 hoop - 6" x 6"

WHAT YOU RECEIVE...
- TURKEY BANNER ITH in the format of your choice.
- Easy to follow Step-by-Step instructions – simply cut as you sew!
- Easy to follow Assembly instructions!

You can find this banner at my website...
www.bigdreamsembroidery.com/turkey-banner-ith-project

To view more of my In-The-Hoop Banners, click here...
www.bigdreamsembroidery.com/category/catalog/hoop-projects/banners 

Happy embroidering!
Related Posts Plugin for WordPress, Blogger...