Showing posts with label holiday. Show all posts

Tutorial - Styling the Christmas Decoration Banner ITH Project.

This is a little step-by-step tutorial on how I styled the Christmas Decoration Banner ITH Project.

I decided that not every banner piece will have a bow with this banner.

1.  For the banner pieces where you want to tie a bow, push the length of ribbon from the back to the front of the eyelet.  Leave a tail of around 5" to make it easier for tying the bows.


2.  Thread the ribbon through the other eyelet from back to front, again leaving a tail of around 5".  You may need more or less than 5" tails of ribbon - it all depends on how nimble your fingers are.


3.  You'll want to have consistent spacing between the banner piece and its neighboring piece before you tie your bow.  I prefer to have my banner pieces close to one another.


4.  When you are happy with your spacing, tie your bow.  

Spend a moment teasing the bow into the right size and shape by gently pulling and re-pulling the tails and loops until you are happy with the result.  


 5.  Repeat the steps for the other eyelets along your banner....


Finally, it's time to trim your tails.  

I recommend you do the trimming after all of your banner pieces and bows are made.


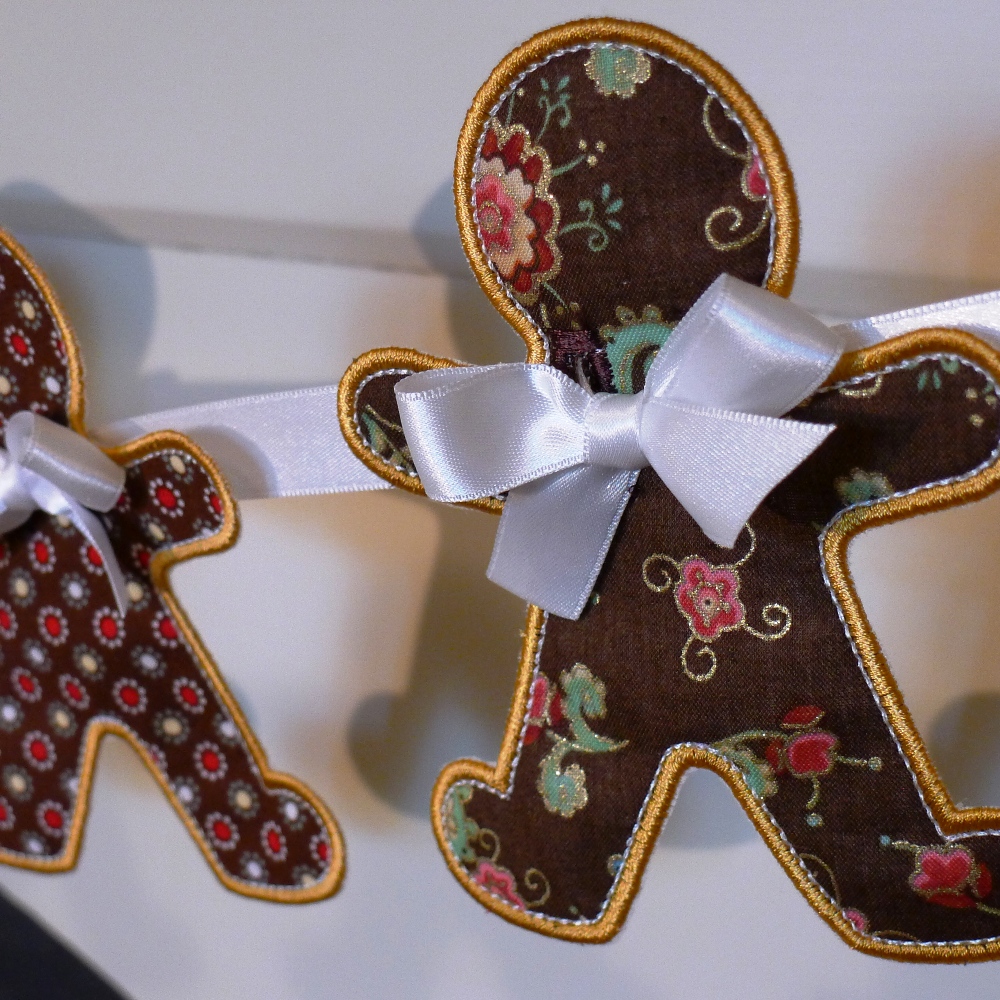
The finished result...  My Christmas Decoration Banner ITH Project is ready to hang!


This method is just one of the many ways you can style your own beautiful banners. I'd love to know your styling methods too!

Have fun!


Star of Bethlehem Machine Embroidery Design Pattern

Perfect for adding finishing touches this Christmas! Add these elegant stars to your Christmas banner, table linen, aprons and more.

This design stitches as a flat fill-stitch and comes in two variations - standard star and long star and features a gorgeous finishing stitch of Triple-Bean against the fill-stitch edges to bring an added luxuriousness to your sew-out.

Star of Bethlehem...
4 sizes - 3", 4", 5" and 6"
Exact sizes:
4x4 hoop - 3" x 3" and 3.91" x 3.91"
5x7 hoop - 5" x 5"
6x10 hoop - 6" x 6"

Star of Bethlehem long...
5 sizes - 3", 4", 5", 6" and 7"
Exact sizes:
4x4 hoop - 3" x 2.21" and 3.91" x 2.9"
5x7 hoop - 5" x 3.68" and 6" x 4.43"
6x10hoop - 7" x 5.16"


Happy embroidering!


GINGERBREAD MAN Machine Embroidery Applique Design Pattern

Perfect for your Christmas projects, this jolly Gingerbread Man has delicious-looking fill-stitched eyes, mouth, bowtie and buttons.

The design features a gorgeous inner-edge stitch and top stitch of Triple-Bean (both can be omitted if desired) which work together to give the impression of a braided finish - adding an extra look of luxury to your Christmas projects.

IDEAS:
- Stitch out a plain gingerbread man and hand-embellish it by adding buttons, spangles, ric rac.
- Add a satin bow to the top to "girlie" up your gingerbread man.

4 Sizes - 4", 5", 6" and 7"
PICTURED is the 5" sew-out..

Exact sizes:
4x4 hoop - 3.92" x 3.19"
5x7 hoop - 5" x 4.06" and 6" x 4.86
6x10 hoop - 7" x 5.67"

You can find this design and more, in my Etsy shop.

Happy embroidering!


GINGERBREAD MAN BANNER In The Hoop Machine Embroidery Applique Design Pattern

You can make this too!...

This in-the-hoop project is a fast and cute way to decorate your home for Christmas. After stitching out, simply tie satin ribbon pieces together to make cute bow ties. You can add letters from your embroidery machine to personalize if desired!

This is a quick and easy two-sided banner all done in the hoop with step-by-step instructions to guide you. You are hooping stabilizer only, appliqueing your fabric and font (if desired) over the top, applying backing fabric behind your hoop, finishing the edges and ribbon holes and trimming away the stabilizer. This banner pieces slide onto ribbon 5/8" wide.

You receive two variations in 4 sizes each...
- a Plain/Personalizable Gingerbread Man Banner (for your fonts) which can also be left plain (as in the above photographs) to show off your favorite Christmas fabrics or color theme.
- or a jolly Gingerbread Man Banner with fill-stitched eyes, mouth and buttons.

IDEAS:
- Stitch out the plain gingerbread man banner and hand-embellish it by adding buttons, spangles, ric rac etc. Use your glue gun if you not fond of handsewing.
- Add a satin bow to the top to "girlie" up your gingerbread man.
- Mix up the sizes on the one banner to create a gingerbread "family".

4 Sizes - 4", 5", 6" and 7"
PICTURED in the brown and red tones are the 5" banner pieces.

Exact sizes:
4x4 hoop - 3.93" x 3.93"
5x7 hoop - 4.99" x 4.99"
6x10 hoop - 5.99" x 5.99"

You can find this project and more in the Bunting and Banners section of my Etsy shop.

Happy embroidering!


CHRISTMAS HOLLY Machine Embroidery Applique Design Pattern

Halloween has passed us by and now the shopping centres are busily putting up Christmas decorations.  The sight of them certainly does lift my spirits.  I do think it's my favorite time of year.  An enduring symbol of Christmas is a sprig of holly with it's bright red berries. 

My newest design is called CHRISTMAS HOLLY.  You've seen it here before?  Yes, I couldn't help but borrow it from my Christmas Plum Pudding design since it looks delightful on its own.  The sizings for the design are different from the Christmas Plum Pudding where they are quite a bit smaller.


Perfect for adding a festive touch to your placemats, napkins...all your Christmas table linen!

Perfect for a Christmas stocking!
Looks really cute on a t-shirt or on a babies bib!


3 Sizes - 3", 4", 5":

Size 4x4 - exact sizes 2.98" x 2.61" and 3.9" x 3.39"
Size 5x7 - exact sizes 4.99" x 4.33"


This is a design where you can use your traditional Christmas colors of deep green and bright red however, because the outline is so obviously of Holly, it enables you to have a bit of fun with it and use other colors too.  Make it more festive by using gold or silver metallic thread for the berries and the leaf veins.


Happy Embroidering!
Related Posts Plugin for WordPress, Blogger...