Showing posts with label flags. Show all posts

Tutorial - Styling the Alphabet Banner ITH Project.

This is a little step-by-step tutorial on how I styled the Alphabet Banner ITH Project.

Working with one eyelet at a time...
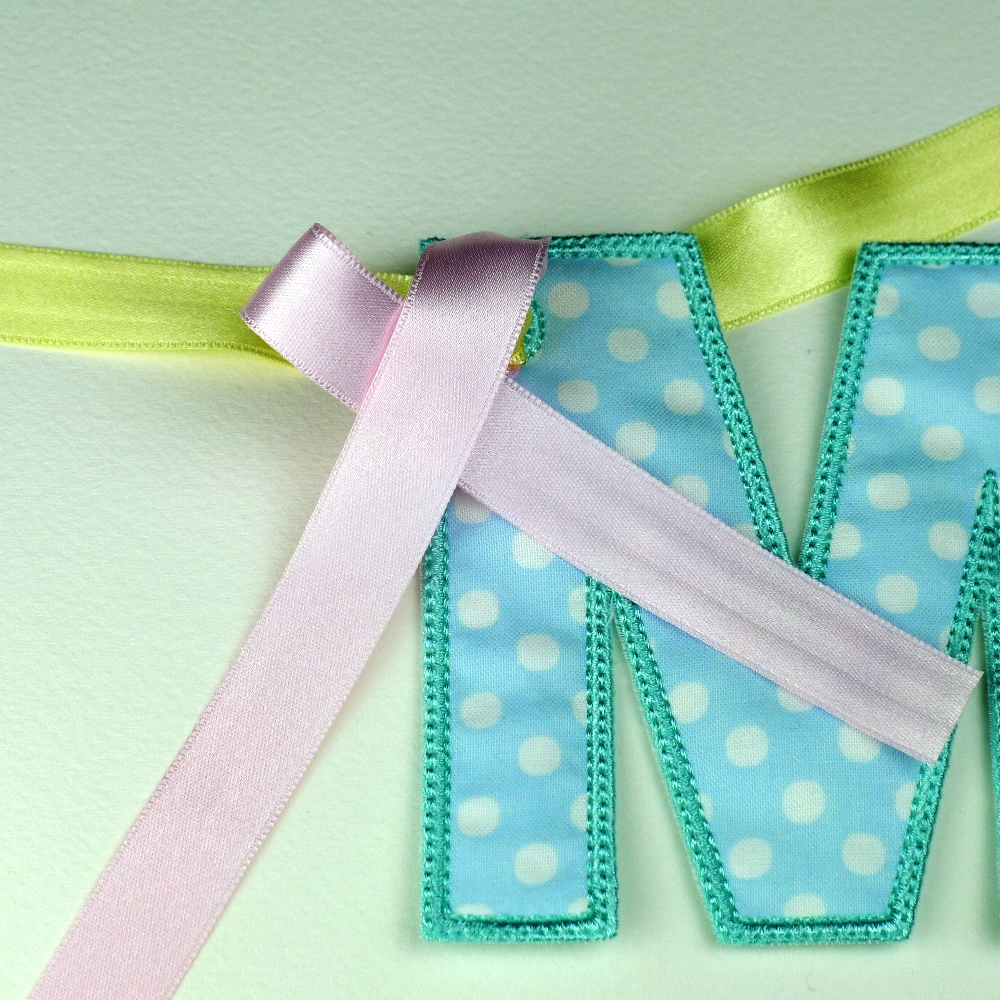
1.  Use something pointed (but not sharp) to push part of the length of hanging ribbon from the back to the front of the eyelet - pull through 1" of ribbon to create a loop.  Make sure this longer length of hanging ribbon stays untwisted and horizontal as you proceed with your banner.
2.  Take a 13" long piece of ribbon and place it vertically midway through the loop.  You may need more or less than 13" of ribbon - it all depends on how nimble your fingers are.
3.  Gently pull the horizontal piece of hanging ribbon so that the loop disappears and gently gathers the vertical piece of ribbon.  Don't pull too much or it will disappear into the eyelet and you will have to start again from step 2. 
4.  Take the bottom half of the ribbon and loop it over to the left with the tail to the right.
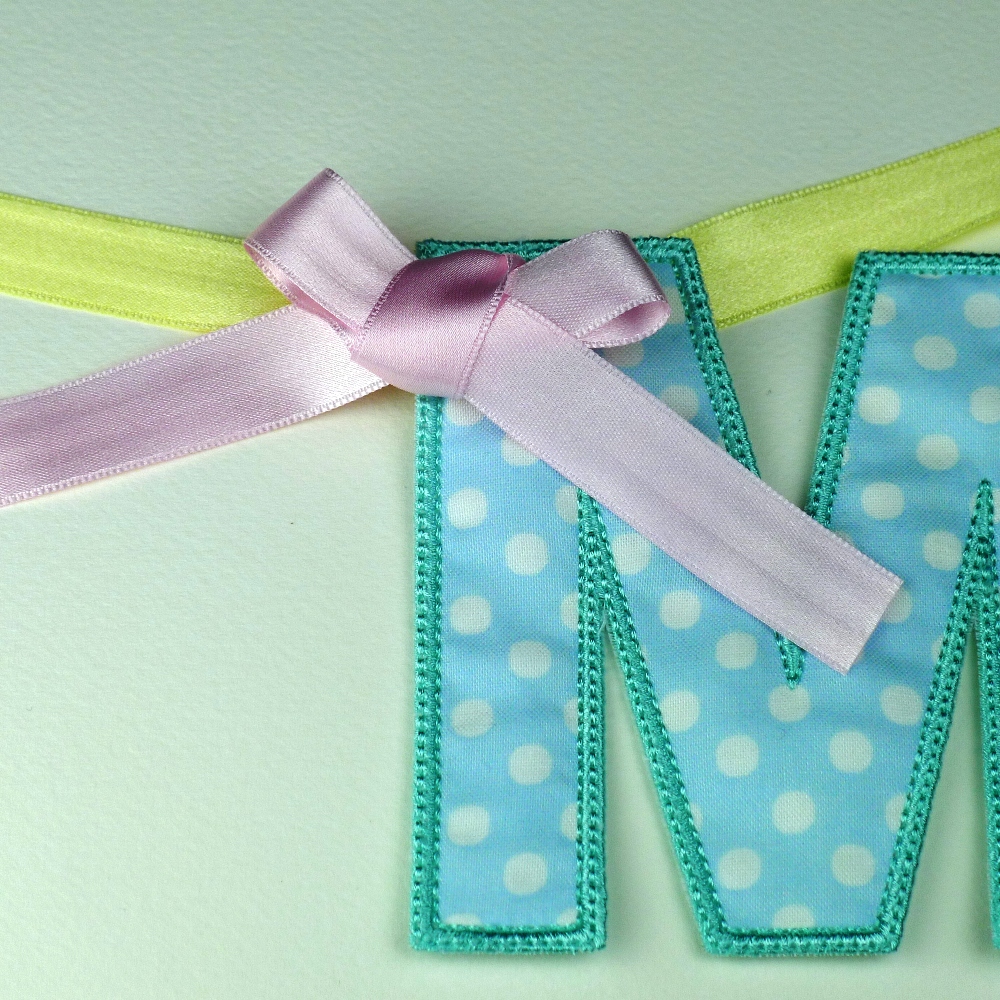
5.  Take the top half of the ribbon and bend the tail over to the bottom left corner while pushing a loop of it through the middle and out to the right hand side.  Now you should have a loose bow.
6.  Spend a minute teasing the bow into the right size and shape by gently pulling and re-pulling the tails and loops until you are happy with the result.  
 7.  Repeat the steps for the other eyelets along your banner....


8. Trim your tails. ...I recommend you do the trimming after all of your banner pieces and bows are made.


This method is just one of the many ways you can style your own beautiful banners. I'd love to know your styling methods too!

Have fun!


Alphabet Banner ITH Project


Here's a versatile set of files you will have a lot of fun with!


Choose your fabrics and threads and you will soon be creating fun personalized banners for every occasion and for fun home decor too.  The hardest part is deciding which colors to use!


The set comprises of uppercase letters and numbers (and an ampersand too) in 3 sizes 4", 5" and 6".


You will be delighted at how quick and easy it is to make this two-sided banner all done in the hoop with step-by-step instructions to guide you. You are hooping stabilizer only, appliqueing your fabric over the top, applying backing fabric behind your hoop, finishing the edges and eyelets and cutting away the stabilizer.


3 sizes - 4", 5" and 6"
PICTURED is the 4" size.

Exact sizes:4x4 hoop - 3.93" high. Width varies to 3.93"5x7 hoop - 5" high. Width varies to 5"6x10 hoop - 6" high. Width varies to 6"

WHAT YOU RECEIVE:
- ALPHABET BANNER ITH Project in the hoop in the format of your choice.- Easy to follow Step-by-Step instructions – simply cut as you sew!
- Easy to follow Assembly instructions!"

You can find this ITH Project at my website: www.bigdreamsembroidery.com/alphabet-banner-ith-project

Happy embroidering!


South Carolina Range Machine Embroidery Design Applique Patterns


Show your love for South Carolina with this fun applique design range!

2 variations - South Carolina with Heart and a plain South Carolina.

These designs feature a gorgeous contrast stitch of Triple-Bean against the Satin Stitch edge which gives your sew-out a quality look. You can use the same thread color if you don't need a contrast or this step can be omitted entirely. These choices give you even more freedom to personalize your South Carolina Range appliques.

4 sizes - 3", 4", 5" and 6"

Exact sizes:
4x4 hoop - 3" x 2.37" and 3.32" x 3.1"
5x7 hoop - 5" x 3.94"
6x10 hoop - 6" x 4.74"

WHAT YOU RECEIVE:
- SOUTH CAROLINA Range in the format of your choice.
- Easy to follow Step-by-Step instructions - Simply cut as you sew!


You can find this applique range at my website: http://www.bigdreamsembroidery.com/south-carolina-range

Happy embroidering!


Hot Air Balloon Banner In The Hoop Project


 Perfect for birthdays or a fun way to coordinate and dress up a child's room.

The Hot Air Balloon Banner is perfect for both boys and for girls! You can add letters and numbers from your embroidery machine to personalize!

There are 2 hot air balloon variations and each size is coordinated so you can mix the different sizes on the one banner to give an illusion of distance. You also receive a gorgeous Cloud banner spacer piece which is perfect for separating two words or it makes for an elegant way to finish off the ends of your banner too.

This is a quick and easy two-sided banner all done in the hoop with step-by-step instructions to guide you. You are hooping stabilizer only, appliqueing your fabric and font/designs over the top, applying backing fabric behind your hoop, finishing the edges and ribbon holes and cutting away the stabilizer. This banner blank slides onto ribbon 5/8" wide. The "balloon rope" ribbons are stitched into the banner pieces during the embroidery process.


5 sizes - 5", 6", 7", 8" and 9"
NB This project is not available for the 4x4 hoop.

PICTURED is the 5" banner pieces combined with the 4" cloud spacer.
NB This banner does not come with any lettering.


Exact sizes:
Hot Air Balloon V1 and V1...
5x7 hoop - 5" x 3.29", 6" x 3.94" and 7" x 4.58"
6x10 hoop - 8" x 5.23" and 9" x 5.88"

Cloud Banner Spacer Piece...
4x4 hoop - 3.91" x 2.45"
5x7 hoop - 5" x 3.11" and 6" x 3.72"

WHAT YOU RECEIVE:
- HOT AIR BALLOON BANNER ITH in the format of your choice.
- Easy to follow Step-by-Step instructions - simply cut as you sew!
- Easy to follow Assembly instructions!

NB: This banner does not come with any lettering. To personalize, add letters from your embroidery machine or your own files.

You can find this banner and more at my website...

Happy embroidering!


Patriotic Bunting In The Hoop Project


You can make this elegant tri-color banner perfect for your 4th of July and Memorial Day celebrations!  Nothing says "I love America" or "Happy 4th" more fittingly than this wonderful shape!

This is a quick and easy two-sided banner all done in the hoop with easy to follow step-by-step instructions to guide you. You are hooping stabilizer only, applying fabrics and backing fabrics behind your hoop, finishing the edges and eyelets and cutting away the stabilizer. This banner pieces then slide onto ribbon.

TIP:  It's perfect just as it is but if you are a confident/advanced editing software user, you can also add fonts/designs to further personalize your banner.

There are 2 backing variations with this design:  If the banner will be seen from both sides, you simply select the Tri-Color backing files; if the banner will be against a wall, you simply select the One-Color backing files.  All instructions are very easy to follow.

6 Sizes - 5", 6", 7", 8", 9" and 10"
NB  This design is NOT available for the 4x4 hoop.
PICTURED is the 7" size

Exact sizes:
5x7 hoop - 5" x 2.87", 6" x 3.43" and 7" x 3.99"
6x10 hoop - 8" x 4.55", 9" x 5.12" and 10" x 5.68"

WHAT YOU RECEIVE:
- PATRIOTIC BUNTING ITH Project in the hoop in the format of your choice.
- Easy to follow Step-by-Step instructions – simply cut as you sew!
- Easy to follow Assembly instructions.


You can find this In The Hoop project at my website...

Happy embroidering!

Teatime Banner ITH Project


Now there's more "tea party chic"!  This in-the-hoop project is a fast and cute way to decorate your home for all kinds of parties.


Styled to fully coordinate with the Cupcake Banner ITH Project, this design includes a vintage style teacup and saucer and a new cupcake shape. You can add letters or designs from your embroidery machine to personalize if desired!


Mix them up together, incorporate different sizes or repeat just one - so many choices with this fun set. The hardest part is choosing your fabrics!


This is a fun two-sided banner all done in the hoop with easy to follow step-by-step instructions to guide you.  You are hooping stabilizer only, appliqueing your fabric over the top, applying backing fabric behind your hoop, finishing the edges and ribbon holes and cutting away the stabilizer. The banner pieces slide onto ribbon 5/8" wide.


Cupcake in 5 sizes - 4", 5", 6", 7" and 8"PICTURED is the 5" size.


Exact sizes:4x4 hoop - 3.91" x 2.88"5x7 hoop - 5" x 3.66", 6" x 4.39 and 7" x 5.11"6x10 hoop - 8" x 5.83"


Teacup and Saucer in 3 sizes - 4", 5" and 6"PICTURED is the 5" size. 


Exact sizes:4x4 hoop - 3.91" x 3.87"5x7 hoop - 5" x 4.95"6x10 hoop - 6" x 5.95"


To view more of my In-The-Hoop Banners, CLICK HERE.


Happy embroidering!


Spool of Thread Banner ITH Project all made in-the-hoop.

Dress up your sewing room or make a clever sign for your sewing business with this fun banner! Add letters or designs from your embroidery machine or personal files to personalize this banner further.

This is a quick and easy two-sided banner all done in the hoop with easy to follow step-by-step instructions to guide you. You are hooping stabilizer only, appliqueing your fabric and font/designs over the top, applying backing fabric behind your hoop, finishing the edges and ribbon holes and cutting away the stabilizer. This banner pieces slide onto ribbon 5/8" wide.

5 Sizes - 4", 5", 6", 7" and 8"
PICTURED is the 5" size.
NB. The 4" size has eyelets instead of buttonholes.

Exact sizes:
4x4 hoop - 3.93" x 2.84"
5x7 hoop - 5" x 3.61", 6" x 4.32" and 7" x 5.03"
6x10 hoop - 8" x 5.75"

WHAT YOU RECEIVE:
- SPOOL OF THREAD BANNER ITH Project in the hoop in the format of your choice.
- Easy to follow Step-by-Step instructions – simply cut as you sew!
- Easy to follow Assembly instructions!

If you need more information, please CLICK HERE.

PLEASE NOTE: This banner does not come with any lettering. Use letters from your embroidery machine or personal files.

To view more of my In-The-Hoop Banners, click here... http://www.bigdreamsembroidery.com/category/catalog/hoop-projects/banners

Happy embroidering!

Related Posts Plugin for WordPress, Blogger...