Showing posts with label ith. Show all posts

Alphabet Banner ITH Project


Here's a versatile set of files you will have a lot of fun with!


Choose your fabrics and threads and you will soon be creating fun personalized banners for every occasion and for fun home decor too.  The hardest part is deciding which colors to use!


The set comprises of uppercase letters and numbers (and an ampersand too) in 3 sizes 4", 5" and 6".


You will be delighted at how quick and easy it is to make this two-sided banner all done in the hoop with step-by-step instructions to guide you. You are hooping stabilizer only, appliqueing your fabric over the top, applying backing fabric behind your hoop, finishing the edges and eyelets and cutting away the stabilizer.


3 sizes - 4", 5" and 6"
PICTURED is the 4" size.

Exact sizes:4x4 hoop - 3.93" high. Width varies to 3.93"5x7 hoop - 5" high. Width varies to 5"6x10 hoop - 6" high. Width varies to 6"

WHAT YOU RECEIVE:
- ALPHABET BANNER ITH Project in the hoop in the format of your choice.- Easy to follow Step-by-Step instructions – simply cut as you sew!
- Easy to follow Assembly instructions!"

You can find this ITH Project at my website: www.bigdreamsembroidery.com/alphabet-banner-ith-project

Happy embroidering!


Lucky Clover Banner ITH Project perfect for St Patrick's Day

An elegant banner perfect for St Patrick's Day celebrations! Add letters or designs from your embroidery machine or personal files to personalize this banner further.

Nothing says "Happy St Patrick's Day" or "I'm Irish" more fittingly than the simple shamrock shape. According to legend, finding a four-leaf clover brings you much more than luck - each leaf represents something: the first is for hope, the second is for faith, the third is for love, and the fourth is for luck.

This is a quick and easy two-sided banner all done in the hoop with easy to follow step-by-step instructions to guide you. You are hooping stabilizer only, appliqueing your fabric and font/designs over the top, applying backing fabric behind your hoop, finishing the edges and ribbon holes and cutting away the stabilizer. This banner pieces slide onto ribbon 5/8" wide.

TIP: Omit the step for the ribbon holes and you've created some cute drink coasters for your green beer!

3 Sizes - 4", 5" and 6"
PICTURED is the 5x7 hoop size - 5" x 5"
NB. The 4" size has eyelets instead of buttonholes.

Exact sizes:4x4 hoop - 3.93" x 3.93"
5x7 hoop - 5" x 5"
6x10 hoop - 6" x 6"

WHAT YOU RECEIVE:
- LUCKY CLOVER BANNER ITH Project in the hoop in the format of your choice.
- Easy to follow Step-by-Step instructions – simply cut as you sew!
- Easy to follow Assembly instructions!

NB. This banner does not come with any lettering. Use letters from your embroidery machine or personal files.


You can find this banner at my website...
www.bigdreamsembroidery.com/lucky-clover-banner-ith-project

To view more of my In-The-Hoop Banners, click here... http://www.bigdreamsembroidery.com/category/catalog/hoop-projects/banners 


Happy embroidering!
  

Dreidel Banner ITH Project perfect for Hanukkah.

You can make this too! This versatile in-the-hoop project is a fast and elegant way to decorate your home for Hanukkah. After stitching out your banner pieces, simply thread ribbon through the eyelets and either string together as a banner or use them individually as gift tags. You can add letters from your embroidery machine to personalize your banner pieces further if desired!

This is a quick and easy two-sided banner all done in the hoop with step-by-step instructions to guide you. You are hooping stabilizer only, appliqueing your fabric and stitching the Hebrew letters over the top, applying backing fabric behind your hoop, finishing the edges and eyelet(s) and trimming away the stabilizer. The banner pieces slide onto ribbon or cord.

30 files! You receive all FIVE VARIATIONS in 6 sizes each:
- Nun
- Gimel
- Hei
- Shin
- and a Blank banner which you can personalize using your own fonts.

NB. The 4" banner has one eyelet (on the top part of the dreidel) making it also perfect for a gift tag. All other sizes have two eyelets.

6 Sizes - 4", 5", 6", 7", 8" and 9"
PICTURED in blue/white are the 6" banner pieces.
PICTURED in golds and bright threads are the 4" banner pieces.

Exact sizes:
4x4 hoop - 3.92" x 2.44"
5x7 hoop - 5" x 3.09", 6" x 3.71" and 7" x 4.31"
6x10 hoop - 8" x 4.93" and 9" x 5.54"

WHAT YOU RECEIVE...- DREIDEL BANNER ITH (5 variations) in the format of your choice.
- Easy to follow Step-by-Step instructions – simply cut as you sew!
- Easy to follow Assembly instructions!

To view more of my In-The-Hoop Banners, click here... http://www.bigdreamsembroidery.com/category/catalog/hoop-projects/banners

Happy embroidering!


Turkey Banner In The Hoop Banner Machine Embroidery Design Applique Pattern

 A fun decoration you can make for Thanksgiving!  You can also add letters from your embroidery machine to personalize! The ribbon "legs" are an optional step.

This is a quick and easy two-sided banner all done in the hoop with step-by-step instructions to guide you. You are hooping stabilizer only, appliquéing your fabric, adding ribbon "legs" and font/designs over the top if you wish, applying backing fabric behind your hoop, finishing the edges and ribbon holes and cutting away the stabilizer. This banner blank slides onto ribbon 5/8" wide.

3 Sizes - 4", 5" and 6"
PICTURED is the 5x7 hoop size - 5" x 5".

Exact sizes:
4x4 hoop - 3.93" x 3.93"
5x7 hoop - 5" x 5"
6x10 hoop - 6" x 6"

WHAT YOU RECEIVE...
- TURKEY BANNER ITH in the format of your choice.
- Easy to follow Step-by-Step instructions – simply cut as you sew!
- Easy to follow Assembly instructions!

You can find this banner at my website...
www.bigdreamsembroidery.com/turkey-banner-ith-project

To view more of my In-The-Hoop Banners, click here...
www.bigdreamsembroidery.com/category/catalog/hoop-projects/banners 

Happy embroidering!

PARTY BALLOON BANNER In The Hoop Banners Machine Embroidery Designs Applique Pattern

Perfect for birthdays...celebrations...or a fun way to coordinate and dress up a room. The Party Balloon Banner is perfect for both boys and for girls!  Add letters and numbers from your embroidery machine to personalize!

This is a quick and easy two-sided banner all done in the hoop with step-by-step instructions to guide you. You are hooping stabilizer only, appliquéing your fabric and font/designs over the top, applying backing fabric behind your hoop, finishing the edges and ribbon holes and cutting away the stabilizer.

This banner blank slides onto ribbon 5/8" wide. The narrower lengths of "balloon string" ribbons are stitched into the banner pieces during the embroidery process.

4 sizes - 4", 5", 6" and 7"
PICTURED is the 4" banner. NB: This banner does not come with any lettering. The lettering used on this banner is the Olivia Font -
http://www.etsy.com/listing/64969080/olivia-font-elegant-machine-embroidery

Exact sizes:
4x4 hoop - 3.91" x 3.10"
5x7 hoop - 5" x 3.96" and 6" x 4.74"
6x10 hoop - 7" x 5.52"

WHAT YOU RECEIVE...
- PARTY BALLOON BANNER ITH in the format of your choice.
- Easy to follow Step-by-Step instructions – simply cut as you sew!
- Easy to follow Assembly instructions!


You can find this gorgeous banner pattern in my Etsy Shop...  http://www.etsy.com/listing/82002929/party-balloon-banner-in-the-hoop-banners 

Happy embroidering!


TATIANA BABUSHKA DOLL In-the-hoop Plush Toy Machine Embroidery Applique Design Pattern

If you are looking for a gorgeous in the hoop doll project, then look no further than Tatiana Babushka Doll.  She's as pretty as a picture with her downcast eyes, red cheeks and heartshaped mouth. Change her hair color and dress her in fabrics from your stash to create many different looks.

When finished, this makes a perfect gift for a little girl.  Left unfinished it is a great project for a young girl learning to handsew.

It's up to you if you want to further embellish your doll using buttons, ric rac, ribbons, rhinestones or lace. 
NB if giving this doll to a child under the age of 3, please do not attach small items as they may present a choking hazard.

Once you've handsewn the back and front of your doll together and stuffed with toyfill, the finished measurements will be 9.5" x 4.5".

This design is for the 6x10 hoop only. You receive 2 digital files - for her front and her back. The design also includes pin markings so you can easily align your pieces for hand sewing.

WHAT YOU RECEIVE...
- TATIANA BABUSHKA DOLL In The Hoop Project in the format of your choice.
- Easy to follow Step-by-Step instructions – simply cut as you sew!
- Easy to follow Step-by-Step assembly instructions including suggested hand stitching techniques with diagrams.


Happy embroidering!


She has a sister too...Anoushka.


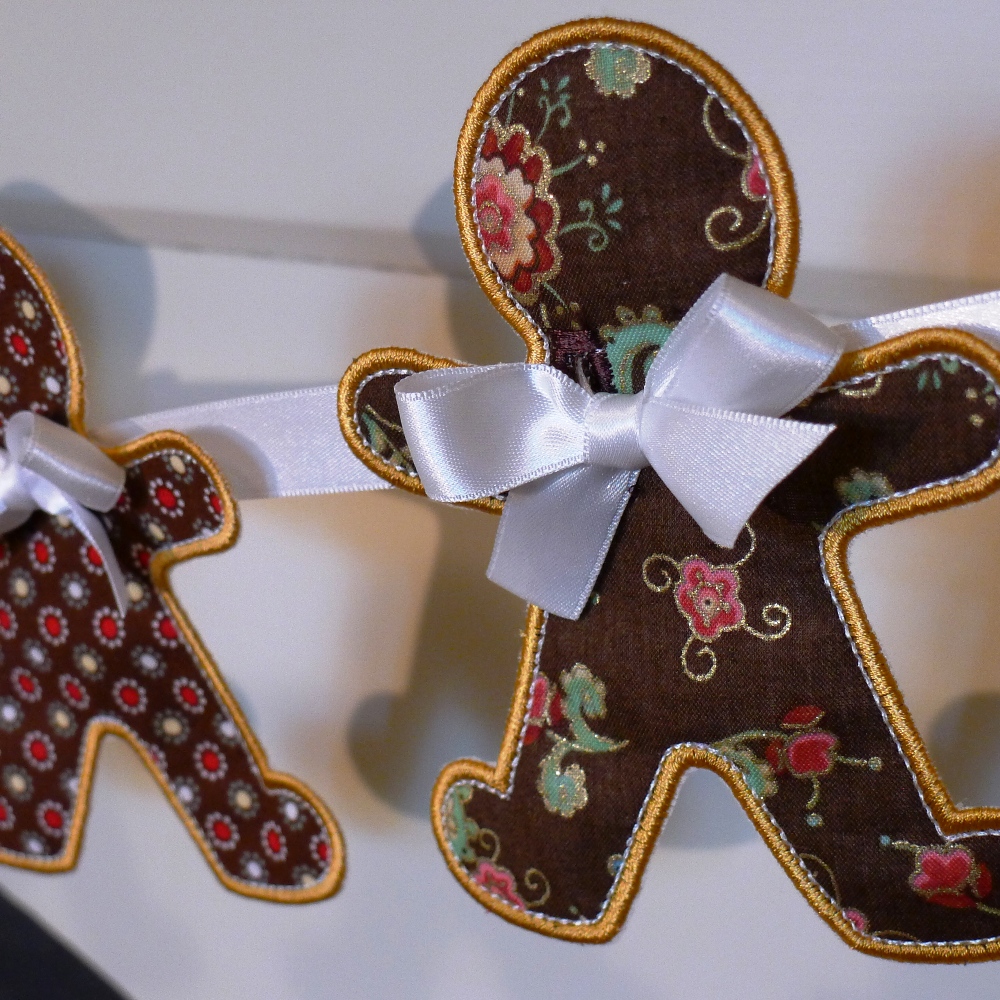
GINGERBREAD MAN BANNER In The Hoop Machine Embroidery Applique Design Pattern

You can make this too!...

This in-the-hoop project is a fast and cute way to decorate your home for Christmas. After stitching out, simply tie satin ribbon pieces together to make cute bow ties. You can add letters from your embroidery machine to personalize if desired!

This is a quick and easy two-sided banner all done in the hoop with step-by-step instructions to guide you. You are hooping stabilizer only, appliqueing your fabric and font (if desired) over the top, applying backing fabric behind your hoop, finishing the edges and ribbon holes and trimming away the stabilizer. This banner pieces slide onto ribbon 5/8" wide.

You receive two variations in 4 sizes each...
- a Plain/Personalizable Gingerbread Man Banner (for your fonts) which can also be left plain (as in the above photographs) to show off your favorite Christmas fabrics or color theme.
- or a jolly Gingerbread Man Banner with fill-stitched eyes, mouth and buttons.

IDEAS:
- Stitch out the plain gingerbread man banner and hand-embellish it by adding buttons, spangles, ric rac etc. Use your glue gun if you not fond of handsewing.
- Add a satin bow to the top to "girlie" up your gingerbread man.
- Mix up the sizes on the one banner to create a gingerbread "family".

4 Sizes - 4", 5", 6" and 7"
PICTURED in the brown and red tones are the 5" banner pieces.

Exact sizes:
4x4 hoop - 3.93" x 3.93"
5x7 hoop - 4.99" x 4.99"
6x10 hoop - 5.99" x 5.99"

You can find this project and more in the Bunting and Banners section of my Etsy shop.

Happy embroidering!


ITH (In The Hoop) SHIELD BANNER in-the-hoop Machine Embroidery Applique Design Pattern

Perfect for birthdays...celebrations...or a fun way to coordinate and dress up a room. Its shape makes it perfect for boys and can be used for girls too! Add letters and numbers from your embroidery machine to personalize!

This is a quick and easy two-sided banner all done in the hoop with step-by-step instructions to guide you. You are hooping stabilizer only, appliquéing your fabric and font/designs over the top, applying backing fabric behind your hoop, finishing the edges and ribbon holes and cutting away the stabilizer.

PICTURED (right) is the 6" banner using Alexander Henry's Truck Stop Dot teamed with The Henley Studio's Pirates Allover.


PICTURED (below) is the 5" banner using a pink gingham teamed with Alexander Henry's Ta Dot in Ocean.

This banner blank slides onto ribbon 5/8" wide or for a nautical look use 1/4" cord. This banner features my signature contrast stitch of Triple Bean inside the Satin Stitch edge which gives you a quality look and allows you to more fully coordinate your thread and fabric colors.

4 Sizes - 4", 5", 6" and 7"

4x4 hoop - exact size 3.91" x 3.12"
5x7 hoop - exact sizes 4.99" x 3.98" and 5.99" x 4.78"
6x10 hoop - exact size 6.99" x 5.57"

WHAT YOU RECEIVE...
- ITH (In The Hoop) SHIELD BANNER in 4 sizes in the format of your choice.
- Easy to follow Step-by-Step instructions – simply cut as you sew!
- Easy to follow Assembly instructions!


Happy embroidering!


Related Posts Plugin for WordPress, Blogger...